arduino:stm32_blue_pill
Table of Contents
STM32 "Blue Pill"
Some quick notes about setting up a STM32F103C8T6 "Blue Pill" for development on Arduino.1)
This page describes the process for settings things up with the Arduino_STM32 tools originally developed by Roger Clarke. These tools are now effectively unsupported.
The main alternative that is supported is the Arduino_Core_STM32 project. I don't know how much of what's below transfers to Arduino_Core_STM32.
Setup
Hardware
In addition to a “Blue Pill,” you will need a 3.3V USB to serial converter.
Lots of pins on the STM32F103C8T6 are purported to be 5V tolerant. The main DC isn't, and I don't know if TX/RX are. So, play it safe and use a 3.3V serial converter. I used a SparkFun Serial Basic configured for 3.3V. Only the TX and RX pins and, optionally, power will be used, so you should be able to use a standard FTDI board as well.
Mind the voltages!
Some serial converter boards put out 5V as VCC even when set to 3.3V mode. Applying 5V to the 3.3V main supply line of a Blue Pill will kill it. Carefully check your 3.3V serial converter board to see whether the VCC output is 3.3V or 5V.
There is a 5V input on the Blue Pill and a USB connector that can power the board from 5V. These go through a small 3.3V regulator.
Connections
- Connect ground from the serial converter board to the
GNDpins of the Blue Pill. - Connect the serial converter's RX to the Blue Pill's
A9. - Connect the serial converter's TX to the Blue Pill's
A10. - If you will be powering the Blue Pill from the serial converter board, connect VCC from the serial converter board to the
3.3pin of the Blue Pill if your serial converter board provides a 3.3V VCC output or the5Vpin if your serial converter board only puts out 5V VCC.
Arduino environment
Do once:
- Under Files > Preferences, add to the “Additional Boards Manager URLs:” field2):
http://dan.drown.org/stm32duino/package_STM32duino_index.json - Under Tools > Board > Boards Manager …, find “STM32F1xxx/GD32F1xxx boards by stm32duino” and install it.
Project config
Under the Tools menu, make the following selections:
- Board : “Generic STM32F103C series”
- Variant : “STM32F103C8 (20k RAM. 64k Flash)”
- Upload method : “Serial”
- CPU Speed(MHz) : “72Mhz (Normal)”
- Optimize : “Smallest (default)”
- Port : wherever the serial converter is plugged into
Programming
- Move the BOOT0 jumper (i.e., the one furthest from the Reset button) to the 1 position (i.e., to the 3.3V pin, closest to the microcontroller IC).
- Push reset.
- Upload the sketch. It should start running.
To re-upload, push reset and upload.
To put the device into “use” mode, move the BOOT0 jumper back to the 0 position (i.e., to GND, away from the microcontroller IC).
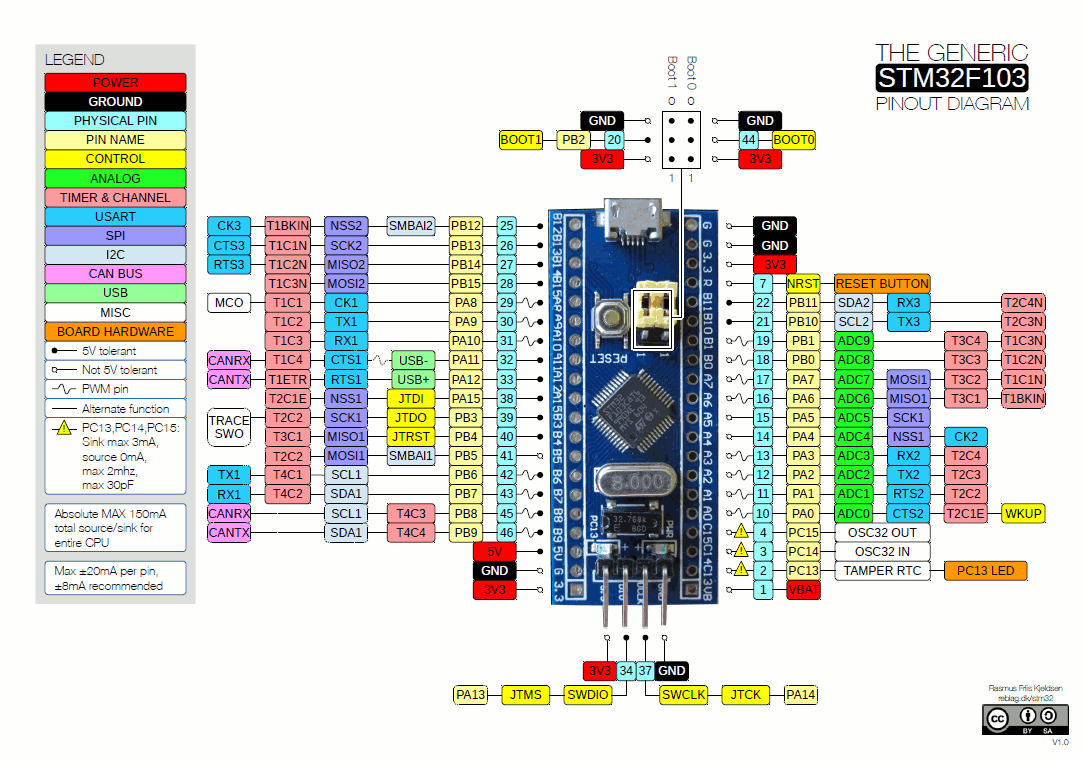
Pinout
From here (Wayback Machine snapshot).3)
Resources
STM32duino
The stm32duino.com domain went down some time ago, apparently because it exceeded the host's traffic limit. The forums are now back online, but not the wiki. You can use the Wayback Machine snapshot links to access unavailable pages.
-
- GitHub repositories for Roger Clarke's Arduino_STM32 based tools.
- GitHub repositories for the Arduino_Core_STM32 based tools.
Other
- STM32-base isn't directed at people using Arduino for STM32 development, but there is still a lot of good information there.
2)
It looks like the URL for the boards has changed to
https://github.com/stm32duino/BoardManagerFiles/raw/master/STM32/package_stm_index.json. However, this list is incompatible with the list athttp://dan.drown.org/stm32duino/package_STM32duino_index.json.3)
An alternative pinout diagram is available here (Wayback Machine snapshot).
arduino/stm32_blue_pill.txt · Last modified: 2022/06/26 01:18 by mithat